Reyhan Tutorial

psp Corel Paintshop x6
Tube
AnaRidzi
Maelle
Mask
aditascreations_mask_53
h_yıllar_mask
Plugins
Mehdi – Weaver
Vanderlee – UnPlugged-x
Mehdi - Copies
AFS Import – Sqborder2
Graphics Plus – Cross Shadow
AP[Lines] Lines – Silverlining
thank you very much for the translation
pinuccia

thank you very much for the translation
pinuccia

thank you very much for the translation
Lg.Regina

thank you very much for the translation
Angela


thank you very much for the translation
Stephen (István)


psp Corel Paintshop x6
Tube
AnaRidzi
Maelle
Mask
aditascreations_mask_53
h_yıllar_mask
Plugins
Mehdi – Weaver
Vanderlee – UnPlugged-x
Mehdi - Copies
AFS Import – Sqborder2
Graphics Plus – Cross Shadow
AP[Lines] Lines – Silverlining
thank you very much for the translation
pinuccia
thank you very much for the translation
pinuccia
thank you very much for the translation
Lg.Regina
thank you very much for the translation
Angela
thank you very much for the translation
Misstyca Design
thank you very much for the translation
Stephen (István)
material
Reyhan
1- File /new - Open 900 x 500 transparent image
2- Choose a light and a dark color from your tube
Properties Foreground; set your Foreground color to #c0c2bf
Properties Background; set your Background color to #008695

#c0c2bf #008695 #002852 #6e2b25 #000000 #ffffff
Properties foreground: Make a foreground- background Gradient of the these two colors

3- Flood fill - Fill With your Gradient
4- Effects – Plugins – Mehdi – Weaver

5-Effects – User Defined Filter – Embos 3
6-Layers – Duplicate
7-Edit – Repeat Duplicate Layer
8-Effects – Plugins – Simple – Diamonds
9-Effects – Plugins – Simple – Left Right Wrap
10-Effects – Plugins – Vanderlee – UnPlugged-x

11-Layers – Arrange – Move Down
12-Layer Platte - Blend Mode – Darken – Opacity 67 ( the opacity setting may be different colors, then drop the setting)
click on the top layer
13--Effects – Plugins – Simple – Horizontal Grain
Layer Platte - Blend Mode - Burn
your image should look like this

14-Layers – New Raster layer
12-Layer Platte - Blend Mode – Darken – Opacity 67 ( the opacity setting may be different colors, then drop the setting)
click on the top layer
13--Effects – Plugins – Simple – Horizontal Grain
Layer Platte - Blend Mode - Burn
your image should look like this

14-Layers – New Raster layer
15-Flood fill - Fill With your Gradient

16-Open – Mask - h_yıllar_mask
17-Layers - New Mask Layer - From Image - h_yıllar_mask
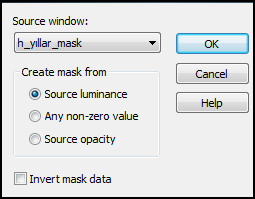
17-Layers - New Mask Layer - From Image - h_yıllar_mask
18- Layers - Merge - Merge Group
19- Layers –Duplicate
20- -Layers - Merge - Merge Down
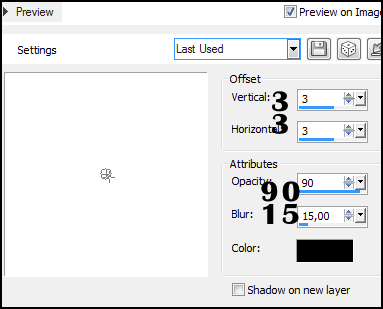
21-Effects - 3D Efects - Drop Shadow / 3 / -3 / 50 / 15 / Black #000000

22- Layers – New Raster layer
23- Flood fill - Fill With your backgroup White #ffffff
24- Open – Mask – aditascreations_mask_53
25- Layers - New Mask Layer - From Image – aditascreations_mask_53

26- Layers - Merge - Merge Group
Layer Platte - Blend Mode – Luminance(Legacy)
27- Effects - 3D Efects - Drop Shadow / 1 / 1 / 100 / 0 / Black #000000

your image should look like this

28- Layers – New Raster layer
29-Selections - Load/Save Selections - Load Selection From Disk – reyhan_sel_1
30- Flood fill - Fill With your Gradient

31-Selections – Select None
32-Effects - Image Effects - Offset / 0 / -100 /

33-Effects - Distortion Effects – Wave

34- Effects - Image Effects - Offset / -100 / 0 /

35-Layers – Duplicate
36-Image – Flip
37-Image – Mirror
38- Layers – Merge –Merge Down
39- Effects - 3D Efects - Drop Shadow / 1 / 1 / 100 / 0 / Black #000000
36-Image – Flip
37-Image – Mirror
38- Layers – Merge –Merge Down
39- Effects - 3D Efects - Drop Shadow / 1 / 1 / 100 / 0 / Black #000000

Layer palette -Blend Mode - Overlay
40-Layers – New Raster layer
41-Selection Tool – Custom Selection


42- Flood fill - Fill With your Gradient
43-Selections – Select None
44-Effects – Plugins – Mura's Meister - Copies

45- Effects – Plugins – AFS Import – Sqborder2

46- Effects - 3D Efects - Drop Shadow / 1 / 1 / 100 / 0 / Black #000000

Layer palette -Blend Mode – Hartlight
47-Open - reyhan_deko
48- Edit - copy
activate your work
49- Edit - paste as new layer
50- Effects - Image Effects - Offset /19 / 198/

51- Effects - Distortion Effects – Wind

52- Effects - Distortion Effects – Wind

53- Layers – New Raster layer
54-Selection Tool – Custom Selection


55-Flood fill - Fill With your backgroup White #ffffff
56-Selections – Select None
57-Effects – Mura's Meister - Copies

58- Effects - 3D Efects - Drop Shadow / 3 / 3 / 100 / 5 / Backgroup Color #008695

your image should look like this

59- Layers – New Raster layer
60-Selections - Load/Save Selections - Load Selection From Disk – reyhan_sel_2
61Flood fill - Fill With your backgroup White #ffffff
62-Selections – select None
63- Effects - 3D Efects - Drop Shadow / 11 / -11 / 100 / 5 / Black #000000

64- Open - reyhan_deko_1
65-Edit / copy
activate your work
66-Edit / paste as new layer
67-Effects - Image Effects - Offset / 332 / 48 /

68-Open - reyhan_deko_2
69- Edit / copy
activate your work
70-Edit / paste as new layer
71-Effects - Image Effects - Offset /0 / 57 /

your image should look like this

72-Open - reyhan_deko_3
73-Edit / copy
activate your work
74- Edit / paste as new layer
75- Effects - Image Effects - Offset / -257 / 40 /

76-Open - AnaRidzi1226
77- Edit / copy
activate your work
78-Edit / paste as new layer
79-Image - Mirror
80-Effects - Image Effects - Offset /-150 /-13 /

81- Effects - 3D Efects - Drop Shadow / 7 / 7 / 90 / 15 / Black #000000

82-Image - Add Borders 1 px - #008695
83-Image - Add Borders 5 px - White #ffffff
84-Image - Add Borders 1 px – #008695
85- Image - Add Borders 5 px - White #ffffff
86-Selections – Select All
87- Image - Add Borders 35 px – #008695
88- Effects - 3D Efects - Drop Shadow / 3 / 3 / 90 / 15 / Black #000000

89-Selections – Invert
90-Effects – Plugins – Graphics Plus – Cross Shadow

91- Effects – Plugins – AP[Lines] Lines – Silverlining

92-Effects - 3D Efects - Drop Shadow / 3 / 3 / 90 / 15 / Black #000000
93-Selections – Select None
94-Image - Add Borders 1 px - White #ffffff
95-Image – resize 900 Pixels

96-Put Your Watermarkt
97-Save JPEG

Dilba Desıgn
Thank you for text work

Jade Desıgn
Thank you for text work

This beautiful version thank you all so much for his work
Hüzünlüyıllar/vahide


Parabéns pelo seu criativo tutorial...
YanıtlaSilMuito interessante.
vou enviar a minha versão em breve.
beijos,
edith