Small Cute Animals

This tutorial is written in PSP x8
Tube
Riet
Thank you very much for the riete for preparing the tubes.
Plugins
Simple – Top Bottom Wrap
Mura’s Meister – Perspective Tiling
Flaming pear – Flood
Alien Skin Eye Candy : 5 Impact – Perspective Shadow – Reflect in Front Sharp
Mask
Narah_mask_0183
Narah_mask_0730

Thank you very much for the translation
Pinuccia

Pinuccia

Angela


Choose a light and a dark color from your tube
Properties Foreground; set your Foreground color to #d48121
Properties Background; set your Background color to #3a180f
Properties foreground: Make a foreground- background Gradient of these two colors
Note: When working with your own colors, play with the Blend Mode and/or Opacity at your own discretion
1-File / New - Open 900 x 600 Transparent Image
Foreground color to #d48121
Background color to #3a180f

2-Effects – Simple – Top Bottom Wrap
3-Effects – Image Effects – Seamless Tiling

4-Layers – Duplicate
5-Image – Mirror – Mirror Horizontal
6-Image – Mirror – Mirror Vertical
Layer Palette - Double click on this Layer and set the Blend Mode to Soft Light Opacity 26
7-Layers – Merge – Merge visible
8-Layers – New Raster Layer
9-Brus Tool
10-Look for / Hy_Small_Cute_Animals_Brus
Place your brush with your foreground color WHITE [left mouse button] on your layer
11-Layer Palette - Double click on this Layer and set the Blend Mode to Luminance (Legacy)
12-Layers – New Raster Layer
Flood fill - Fill With your Background color #FFFFFF
13-Open- Small_Cute_Animals_Mask – Narah_mask_0730
14-Layers - New Mask Layer - From Image – Narah_mask_0730

15-Layers - Merge - Merge Group
 place it like this
17-Layers – New Raster Layer
Flood fill - Fill With your Background color #FFFFFF
18-Open- Small_Cute_Animals_Mask – Narah_mask_0183
19-Layers - New Mask Layer - From Image – Narah_mask_0183

20-Layers - Merge - Merge Group
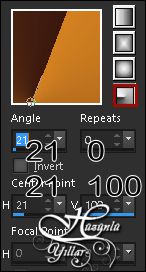
21-Effects – Mura’s Meister – Perspective Tiling

22-Selectons - Selections - Load/Save Selections - Load Selection From Disk – Hy_Small_Cute_Animals_Sel
Press The Delete Key On Your Keyboard
23-Selections – Select None
Layer Palette - Double click on this Layer and set the Blend Mode to Overlay Opaticy 75
24-Layers – Duplicate
25-Image – Mirror – Mirror Vertical
Layer Palette - Double click on this Layer and set the Blend Mode to Dodge Opaticy 20
26-Layers – Merge – Merge Down
Click on The Bottom - Layers – Merged

27-Effects – Flaming pear – Flood

Activite Top Layers
28-Open - Hy_Small_Cute_Animals_Tube - Riet_391_290518
Edit / Copy
29-activate your work
30-Edit / Paste as New Layer
31-Adjust – Blur – Radial Blur

32-Image – Image Effects – Seamless Tiling

Layer Palette - Double click on this Layer and set the Blend Mode to Hard Light Opaticy 63
33-Effects – İllumination Effects – Sunburst -

34-Layers – New Raster Layer
35-Selectons - Selections - Load/Save Selections - Load Selection From Disk – Hy_Small_Cute_Animals_Sel_1
Flood fill - Fill With your Background color #FFFFFF ( 2 + 3 Times )
36-Selections – Select None
37-Open - Hy_Small_Cute_Animals_Tube - Hy_Small_Cute_Animals_Deko
38-Edit / Copy
activate your work
39-Edit / Paste as New Layer
40-Open - Hy_Small_Cute_Animals_Tube - Hy_Small_Cute_Animals_Deko_1
41-Edit / Copy
activate your work
42-Edit / Paste as New Layer
43-Activate Pick Tooland
place it like this 
44-Open - Hy_Small_Cute_Animals_Tube - Hy_Small_Cute_Animals_View
45-Edit / Copy
activate your work
46-Edit / Paste as New Layer
47-Adjust – Sharpness – Sharpen More
48-Open - Hy_Small_Cute_Animals_Tube - Hy_Small_Cute_Animals_Deko_2
49-Edit / Copy
activate your work
50-Edit / Paste as New Layer
51-Open - Hy_Small_Cute_Animals_Tube - Hy_Small_Cute_Animals_Bird
52-Edit / Copy
activate your work
53-Edit / Paste as New Layer
54Activate Pick Tooland
place it like this 
55-Adjust – Sharpness – Sharpen More
56-Open - Hy_Small_Cute_Animals_Tube - Hy_Small_Cute_Animals_Bird_1
57-Edit / Copy
activate your work
58-Edit / Paste as New Layer
59-Activate Pick Tooland
place it like this 
60-Adjust – Sharpness – Sharpen More
61-Open - Hy_Small_Cute_Animals_Tube - Riet_391_290518
62-Edit / Copy
activate your work
63-Edit / Paste as New Layer
64-Activate Pick Tooland
place it like this 
65-Effects - Alien Skin Eye Candy : 5 Impact – Perspective Shadow – Reflect in Front Sharp

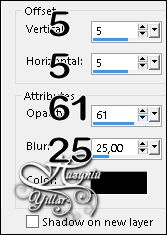
66-Effects – 3D Effects – Drop Shadow
67-Open - Hy_Small_Cute_Animals_Tube - Hy_Small_Cute_Animals_Deko_3
68-Edit / Copy
activate your work
69-Edit / Paste as New Layer
70-Activate Pick Tooland
place it like this 
71-Effects – 3D Effects – Drop Shadow
72-Open - Hy_Small_Cute_Animals_Tube - Hy_Small_Cute_Animals_Text
73-Edit / Copy
activate your work
74-Edit / Paste as New Layer
75-Activate Pick Tooland
place it like this 
76-Image - Add Borders - Symmetric, 1 pixel, color
77-Image - Add Borders - Symmetric, 1 pixel, color #d48121
78-Image - Add Borders - Symmetric, 5 pixel, color #FFFFFF
79-Image - Add Borders - Symmetric, 1 pixel, color #d48121
80-Selections – select All
81-Image - Add Borders - Symmetric, 40 pixel, color #3a180f
82-Effects – 3D Effects – Drop shadow


83-Selections – Select None
84-Image - Add Borders - Symmetric, 1 pixel, color #d48121
85-Image - Add Borders - Symmetric, 5 pixel, color #FFFFFF
86-Image - Add Borders - Symmetric, 1 pixel, color #d48121
87-Put Your Watermarkt
Image Resize – By Pixels - 900
Save JPEG
Second Visual Work


Thank You Ceylan/Dünya


Hüzünlüyıllar/vahide


Harika Bir ders ablacım ellerinize saglık
YanıtlaSil