Tube
81_Femme_Page6_Animabelle
mentali-oiseau73
3790-luzcristina
Babette
mentali-oiseau73
3790-luzcristina
Babette
Plugins
Nick Software – Color Efex Pro 3.0
MuRa's Meister
Nick Software – Color Efex Pro 3.0
MuRa's Meister
L&K siteofwonders - L&K’Zitah
Toadies
AFS Import
Plugins AB 21 - Cheap Video Tricke
Toadies
AFS Import
Plugins AB 21 - Cheap Video Tricke
Filter Unlimited 2.0 - Transparency - Set Transparency
Flaming Pear
Alien Skin Eye Candy : 5 Impact
Thank you very much for the translation
Angela
Thank you very much for the translation
Pinuccia
Thank you very much for the translation
Pinuccia
Thank you very much for the translation
Angela
Thank you very much for the translation
Pinuccia
Thank you very much for the translation
Pinuccia
Download link
Preparation:
Choose a light and a dark color from your tube
Properties Foreground; set your Foreground color to #FFFFFF
Properties Background; set your Background color to #000000
Properties foreground: Make a foreground- background Gradient of these two colors
Note: When working with your own colors, play with the Blend Mode and/or Opacity at your own discretion
#FFFFFF #000000
#FFFFFF #000000
1-File / New - Open 900 x 500 Transparent Image
2-Selections - Select All
3-Open – Hy_Camellia_İmaj Background
4-Edit / Copy
activate your work
5-Edit / Paste Into Selections
6-Selections - Select None
NOT:According to the material,Try the following settings to use different colors.Enter the color you want to use in the Color box
8-Adjust - Blur - Radial Blur

10-Layers - Duplicate
Not:Copy Of raster 1 Eye closed / Raster 1,let's continue
11-Selections - Load/Save Selections - Load Selection From Disk – Hy_Camellia_sell
12-Selections – Promote Selection to Layer
13-Seletions – Select None14-Effects - MuRa's Meister - Pole Transform
15-Effects - Edge Effects - Enhance
16-Effects - L&K siteofwonders - L&K’Zitah
Layer Palette - Double click on this Layer and set the Blend Mode to ‘’Luminance ( Legacy )’’ Opacity 75
Active Raster 1
Active Raster 1
17-Selections - Load/Save Selections - Load Selection From Disk – Hy_Camellia_Sell_1
18-Selections – Promote Selection to Layer
19-Seletions – Select None20-Effects - Toadies - What Ar You
21-Effects - Edge Effects - Dilate
22-Effects - AFS Import - SqBorder2
Layer Palette - Double click on this Layer and set the Blend Mode to ‘’Luminance
23-Layers - Duplicate
24-Image - Mirror - Mirror Vertikal
25-Image - Mirror - Mirror Horizontal
Not:Let us open the eyes and continue from there ( Copy of Raster 1 )
26-Effects - Plugins AB 21 - Cheap Video Tricke
27-Layer Palette - Double click on this Layer and set the Blend Mode to ‘’Luminance ( Legacy )’’
28-Effects - Filter Unlimited 2.0 - Transparency - Set Transparency
Layers - Arrange - Move Down ( 3+Times )
Click Top Layer
30-Edit / Copy
activate your work
31-Edit / Paste As New Layer
Press K on your keyboard to activate the Pick Tool
32-Enter these parameters for the ( Positions X 0,00 ) and ( Positions Y Minus -17,00 ) Positions on the Toolbar
Hit any key on your keyboard to close the Pick Tool
33-Open – Hy-Camellia_Tube_Deko - Hy_Camellia_Deko_1
34-Edit / Copy
activate your work
35-Edit / Paste As New Layer
Layers - Duplicate
36-Effects - Flaming Pear - Flood - Hy_Camellia_Flood_Preset
37-Open – Hy-Camellia_Tube_Deko - Hy_Camellia_Deko_2
38-Edit / Copy
activate your work
39-Edit / Paste As New Layer
Press K on your keyboard to activate the Pick Tool
40-Enter these parameters for the ( Positions X 0,00 ) and ( Positions Y 0,00 ) Positions on the Toolbar
Hit any key on your keyboard to close the Pick Tool
41-Open – Hy-Camellia_Tube_Deko - Hy_Camellia_Text42-Edit / Copy
activate your work
43-Edit / Paste As New Layer
Press K on your keyboard to activate the Pick Tool
44-Enter these parameters for the ( Positions X 191,00 ) and ( Positions Y 18,00 ) Positions on the Toolbar
Hit any key on your keyboard to close the Pick Tool
45-Open – Hy-Camellia_Tube_Deko - Hy_Camellia_View
46-Edit / Copy
activate your work
47-Edit / Paste As New Layer
Layer Palette - Double click on this Layer and set the Blend Mode to ‘’Luminance ( Legacy )’’
48-Open – Hy-Camellia_Tube_Deko - Hy_Camellia_Text_1
49-Edit / Copy
activate your work
50-Edit / Paste As New Layer
Press K on your keyboard to activate the Pick Tool
51-Enter these parameters for the ( Positions X 1,00 ) and ( Positions Y 31,00 ) Positions on the Toolbar
Hit any key on your keyboard to close the Pick Tool
52-Open – Hy-Camellia_Tube_Deko - Hy_Camellia_Flower
53-Edit / Copy
activate your work
54-Edit / Paste As New Layer
Press K on your keyboard to activate the Pick Tool
55-Enter these parameters for the ( Positions X Minus -20,00 ) and ( Positions Y 159,00 ) Positions on the Toolbar
Hit any key on your keyboard to close the Pick Tool
56-Open – Hy-Camellia_Tube_Deko - Hy_Camellia_Bird
57-Edit / Copy
activate your work
58-Edit / Paste As New Layer
Press K on your keyboard to activate the Pick Tool
59-Enter these parameters for the ( Positions X 111,00 ) and ( Positions Y 8,00 ) Positions on the Toolbar
Hit any key on your keyboard to close the Pick Tool
60-Open – Hy-Camellia_Tube_Deko - Hy_Camellia_Bird_2
61-Edit / Copy
activate your work
62-Edit / Paste As New Layer
Press K on your keyboard to activate the Pick Tool
63-Enter these parameters for the ( Positions X 387,00 ) and ( Positions Y 145,00 ) Positions on the Toolbar
Hit any key on your keyboard to close the Pick Tool
64-Open – Hy-Camellia_Tube_Deko - 81_Femme_Page6_Animabelle
65-Edit / Copy
activate your work
66-Edit / Paste As New Layer
Press K on your keyboard to activate the Pick Tool
67-Enter these parameters for the ( Positions X 242,00 ) and ( Positions Y 220,00 ) Positions on the Toolbar
Hit any key on your keyboard to close the Pick Tool
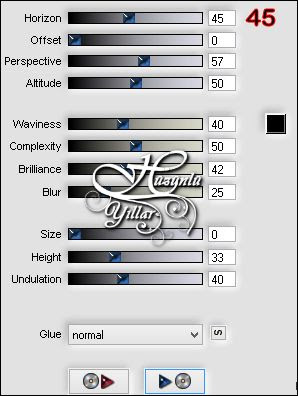
68-Efects - Alien Skin Eye Candy : 5 Impact - Perspective Shadow - Hy_Camellia_PersShadow
69-Open – Hy-Camellia_Tube_Deko - Hy_Camellia_Text_2
70-Edit / Copy
activate your work
71-Edit / Paste As New Layer
Press K on your keyboard to activate the Pick Tool
72-Enter these parameters for the ( Positions X 654,00 ) and ( Positions Y 398,00 ) Positions on the Toolbar
Hit any key on your keyboard to close the Pick Tool
73-Image - Add Borders - Symmetric, 1 pixel, color #FFFFFF
74-Image - Add Borders - Symmetric, 1 pixel, color #155b99
75-Selections - Select All
76-Image - Add Borders - Symmetric, 45 pixel, color #FFFFFF
77-Effects - Alien Skin Eye Candy : 5 Impact - Perspective Shadow - Drop shadow - Blurry
78-Selections - Select None
79-Image - Add Borders - Symmetric, 1 pixel, color #155b99
80-Image - Add Borders - Symmetric, 1 pixel, color #FFFFFF
81-Open – Hy-Camellia_Tube_Deko - Hy_Camellia_Deko_3
82-Edit / Copy
activate your work
83-Edit / Paste As New Layer
84-Image - Add Borders - Symmetric, 1 pixel, color #155b99
85-Put Your Watermarkt
86-Image Resize – By Pixels - 900
Save JPEG
activate your work
66-Edit / Paste As New Layer
Press K on your keyboard to activate the Pick Tool
67-Enter these parameters for the ( Positions X 242,00 ) and ( Positions Y 220,00 ) Positions on the Toolbar
Hit any key on your keyboard to close the Pick Tool
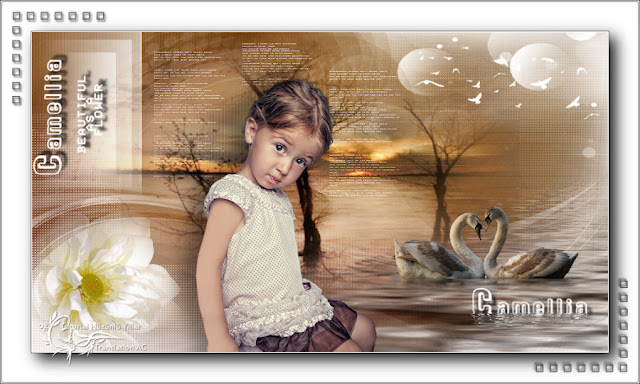
68-Efects - Alien Skin Eye Candy : 5 Impact - Perspective Shadow - Hy_Camellia_PersShadow
69-Open – Hy-Camellia_Tube_Deko - Hy_Camellia_Text_2
70-Edit / Copy
activate your work
71-Edit / Paste As New Layer
Press K on your keyboard to activate the Pick Tool
72-Enter these parameters for the ( Positions X 654,00 ) and ( Positions Y 398,00 ) Positions on the Toolbar
Hit any key on your keyboard to close the Pick Tool
73-Image - Add Borders - Symmetric, 1 pixel, color #FFFFFF
74-Image - Add Borders - Symmetric, 1 pixel, color #155b99
75-Selections - Select All
76-Image - Add Borders - Symmetric, 45 pixel, color #FFFFFF
77-Effects - Alien Skin Eye Candy : 5 Impact - Perspective Shadow - Drop shadow - Blurry
78-Selections - Select None
79-Image - Add Borders - Symmetric, 1 pixel, color #155b99
80-Image - Add Borders - Symmetric, 1 pixel, color #FFFFFF
81-Open – Hy-Camellia_Tube_Deko - Hy_Camellia_Deko_3
82-Edit / Copy
activate your work
83-Edit / Paste As New Layer
84-Image - Add Borders - Symmetric, 1 pixel, color #155b99
85-Put Your Watermarkt
86-Image Resize – By Pixels - 900
Save JPEG
Test çalışması için Aynur,a çok teşekkür ederim
Test çalışması için Aslı,ya çok teşekkür ederim
For Translation Thank you very much Pinuccia


