Pinuccia Lots Of Love

This tutorial is written in PSP x8
Plugins
Kiwi’s Oelfilter – Setzboard
Kiwi’s Oelfilter – Setzboard
MuRa’s Meister – Perspectif Tiling
Alien Skin Eye Candy : 5 Impact – Reflect in Front,Short
Tube
Tube
Smart Tube
Gabrye
Mask
Gabrye
Mask
Hüzünlüyıllar
Materials
Pinuccia Download
Thank you very much for the translation
Angela

Thank you very much for the translation
Pinuccia

Thank you very much for the translation
Pinuccia

Materials
Pinuccia Download
Thank you very much for the translation
Angela
Thank you very much for the translation
Pinuccia
Thank you very much for the translation
Pinuccia

Preparation:
Choose a light and a dark color from your tube
Color

Properties Foreground; set your Foreground color to #775a69
Properties Background; set your Background color to #1b1227
1- File / New - Open 900 x 600 Transparent Image
2-Flood Fill - Fill With Your Gradient 

3-Layers – Duplicate
Close the top layer, let's continue from the bottom layer

4-Effects – Kiwi’s Oelfilter – Setzboard

5-Open – Pinuccia_Tube&Deko – Pinuccia_Image

6-Edit / Copy
activate your work
7-Edit / Paste As New Layer
Adjust – Hue And Saturation – Hue And Saturation/Lightness

Open up the top layer, we keep going ( Copy Of Raster 1 )

8-Effects - Texture Effects - Weave

9-Effects - Image Effects - Seamless Tiling

10-Effects - Edge Effects – Enhance
11-Effects – User Defined Filter - Embos 3
Layers Palette Blend Mode Overlay – Opacity 55
12-Effects – IIIumination Effects – Sunburst #FFFFFF

13-Layers – Merge – Merge Visible
Background Color to #FFFFFF
14-Layers – New Raster Layers

15-Flood Fill Tool - Fill With Your Background Color #FFFFFF
16-Open - Hy-Pinuccia_Mask - huzunluyıllar_145
16-Open - Hy-Pinuccia_Mask - huzunluyıllar_145

17-Layers - New Mask Layer - From Image – HuzunluYıllar_145

18-Layers - Duplicate
19-Layers - Merge - Merge Group
20-Selections - Selections - Load/Save Selections - Load Selection
From Disk – Hy_Sell_Pinuccia
Press key to Delete from Keyboard
21-Selections – Select None
21-Selections – Select None
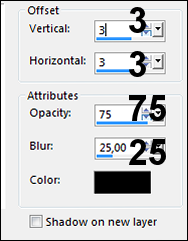
22-Effects - 3D Effects - Drop Shadow / 3 / 3 / 75 / 25 / Black #000000
Layers Palette Blend Mode Hard Light - Opacity 83
Layers Palette Blend Mode Hard Light - Opacity 83
23-Open – Hy-Pinuccia_Tube&Deko - Pinuccia_deko
24-Edit / Copy
activate your work
25-Edit / Paste As New Layer
26-Image – Resize 85%
Activate Pick Tooland place it like this

27-Effects – Image Effects – Seamless Tiling
place it like this27-Effects – Image Effects – Seamless Tiling

28-Effects – MuRa’s Meister – Perspectif Tiling

29-Selections - Load/Save Selections - Load Selection From Disk –
Hy_Pinuccia_Sell_1
Press key to Delete from Keyboard
30-Selections – Select None
31-Layers – New Raster Layers
32-Flood Fill Tool - Fill With Your Background Color #ffffff
32-Flood Fill Tool - Fill With Your Background Color #ffffff
33-Open - Hy-Pinuccia_Mask - huzunluyıllar_198


34-Layers - New Mask Layer - From Image – huzunluyıllar_198

35-Layers - Merge - Merge Group
35-Layers - Merge - Merge Group
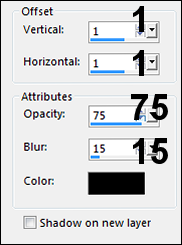
36-Effects - 3D Effects - Drop Shadow / 1 / 1 / 75 / 15 / Black #000000
37-Open – Hy-Pinuccia_Tube&Deko - Hy_Pinuccia_Text
37-Open – Hy-Pinuccia_Tube&Deko - Hy_Pinuccia_Text
38-Edit / Copy
activate your work
39-Edit / Paste As New Layer
Activate Pick Tooland
place it like this
Background color to #FFFFFF
40-Layers – New Raster Layers
41-Selections - Load/Save Selections - Load Selection From Disk –
Hy_Pinuccia_Sell_2
42- Flood Fill Tool - Fill With Your Background Color #FFFFFF
43-Selections – Modify – Contract 1px
43-Selections – Modify – Contract 1px
Press key to Delete from Keyboard
44-Flood Fill Tool - Fill With Your Background Color #FFFFFF Opacitye 25 45-Selections – Select None
Flood Fill Tool Opacity 100 Set
46-Layers – Duplicate
47-Image – Mirror – Mirror Horizontal
48-Layers – Merge – Merge Down
49- Background Color to #FFFFFF
50-Layers – New Raster Layers
51-Selections - Load/Save Selections - Load Selection From Disk –Hy_Pinuccia_Sell_3
Flood Fill Tool - Fill With Your Background Color #FFFFFF
52-Selections – Select None
53-Open – Hy-Pinuccia_Tube&Deko - Hy_Pinuccia_Deko_1
 54-Edit / Copy

activate your work
55-Edit / Paste As New Layer
Activate Pick Tooland place it like this

56-Open – Hy-Pinuccia_Tube&Deko - Hy_Pinuccia_Deko_2
place it like this56-Open – Hy-Pinuccia_Tube&Deko - Hy_Pinuccia_Deko_2

57-Edit – Copy
Activate your work
58-Edit – Paste As New layer
59-Effects – 3D Effects – Drop Shadow 5 / 5 / / 65 / 15
60-Open – Hy-Pinuccia_Tube&Deko - Hy_Pinuccia_Deko_3


61-Edit – Copy
Activate your work
62-Edit – Paste As New layer
63- Background Color to #FFFFFF
64-Layers – New Raster Layers
65-Selections - Load/Save Selections - Load Selection From Disk –Hy_Pinuccia_Sell_4
Flood fill tool - Fill with your Background color #FFFFFF
66-Selections – Select None
67-Effects – Distortion Effects – Wind – from Left - Wind Strenght 100
68-Effects – Distortion Effects – Wind – from Right - Wind Strenght 100
69-Effects – 3D Effects – Drop Shadow 5 / 5 / / 65 / 15
70-Open – Hy-Pinuccia_Tube&Deko – Pinuccia_Text_1


71-Edit – Copy
Activate your work
72-Edit – Paste As New layer
Activate Pick Tooland place it like this

73-Open – Hy-Pinuccia_Tube&Deko – Smart_Tube
place it like this73-Open – Hy-Pinuccia_Tube&Deko – Smart_Tube

74-Edit – Copy
Activate your work
75-Edit – Paste As New layer
Activate Pick Tooland place it like this

76-Alien Skin Eye Candy : 5 Impact – Reflect in Front,Short
place it like this76-Alien Skin Eye Candy : 5 Impact – Reflect in Front,Short

77- Open – Hy-Pinuccia_Tube&Deko – Hy_Pinuccia_Deko_4

78-Edit – Copy
Activate your work
79-Edit – Paste As New layer
Activate Pick Tooland place it like this

80- Image - Add Borders - Symmetric, 1 pixel, color #1b1227
place it like this80- Image - Add Borders - Symmetric, 1 pixel, color #1b1227
81-Image - Add Borders - Symmetric, 5 pixel, color #ffffff
82-Image - Add Borders - Symmetric, 1 pixel, color #1b1227
83-Put Your Watermarkt
Save JPEG

Seyran hocam

Aynur Design

Angela

Pinuccia


Mersel


Şahmaran

PİNUCCİA VERSİYON


Köszönöm a szép leckét!puszi...
YanıtlaSilNagyon szépen köszönöm
YanıtlaSilszerelem